

How To Use Smart Filters In Photoshop
Smart Filters, outset introduced in Photoshop CS3, let you apply any of Photoshop's filter effects to a layer non-destructively. This means that — different a regular filter — a Smart Filter doesn't permanently modify the pixels in a layer.
Smart Filters give you lot a lot of creative freedom. For example, you can:
- Toggle a Smart Filter on or off. Unlike a regular filter, where the effect is permanently applied, you can opposite the effect of a Smart Filter past just turning it off, or deleting it birthday. You tin can also hands compare an image with and without the filter effect by toggling the filter.
- Go back and edit a Smart Filter's settings at whatsoever time. Smart filters are totally re-editable. Want to brand a Gaussian Blur effect more prominent after y'all've practical it? Just double-click the Smart Filter and increase its Radius value.
- Hands mask off parts of a Smart Filter. This is my favourite Smart Filters feature. Each layer comes with its own filter mask, letting yous selectively hide parts of a filter's consequence in the image by painting on the mask.
- Utilize blending options to Smart Filters. Just equally with layers, you can give each Smart Filter its own blend mode and tweak its opacity.
In this tutorial you'll learn how to practice all of these things with Photoshop's wonderful Smart Filters. Let'due south get going!
Adding a Smart Filter
To add a Smart Filter to a layer, you starting time need to turn the layer into a Smart Object, if information technology isn't one already. To do this, first select the layer, then choose .
Once your layer is a Smart Object, simply cull any filter from the carte to apply that filter as a Smart Filter. Usually, a dialog appears assuasive you to tweak the filter (much like applying a regular filter). Once you lot click in the dialog, the Smart Filter is applied, and yous'll see a Smart Filters item appear below the layer in the Layers panel:
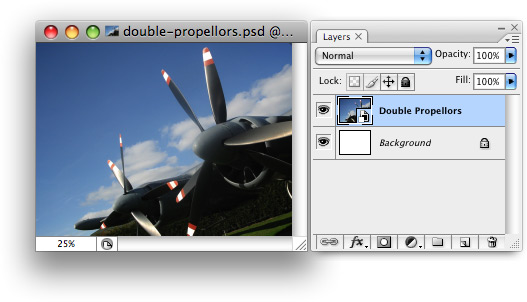
To utilize a Smart Filter to a layer, you starting time need to make sure the layer is a Smart Object.

When you lot apply a filter to a Smart Object — in this case, a Gaussian Blur filter — a Smart Filter is created and displayed in the Layers panel.
Equally you can see from the above screenshot, the Smart Object now has a little lens filter icon next to it in the Layers panel, as well every bit the Smart Filters detail beneath it. The Smart Filters detail contains the thumbnail for the filter mask, and the Smart Filters themselves appear in a listing below the Smart Filters detail.
Editing a Smart Filter
And so far, a Smart Filter doesn't seem that much different from a regular filter. However, here's where the fun begins!
Permit'south say you've overdone the Gaussian Mistiness effect a bit, and desire to tone it downward. With a regular filter you'd take to step dorsum in the History panel, or reopen an earlier version of the document. With Smart Filters, though, all y'all need to practise to change the Gaussian Blur filter is double-click it in the Layers console. This pops upwardly the filter options dialog again, allowing you to re-edit the filter's settings:
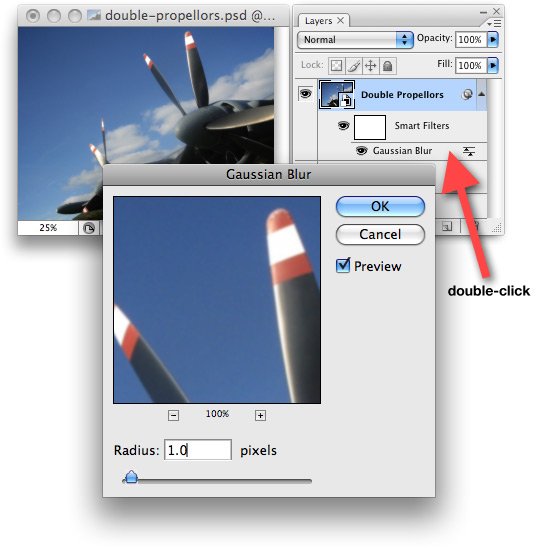
Double-click the Gaussian Blur Smart filter in the Layers console to re-edit the filter'southward settings.
Here are some other ways yous can edit Smart Filters:
- Toggle a filter. Click the eye icon next to a filter in the Layers panel to plow the filter issue off or on. Yous can also click the eye icon side by side to the Smart Filters item to toggle all filters for that Smart Object.
- Reorder filters. You can change the social club that Smart Filters are applied to a Smart Object by dragging the filters around in the Layers panel. Since the order that filters are practical can dramatically touch the final result, this flexibility lets you lot create all sorts of interesting effects.
- Move/copy filters between Smart Objects. Want to apply a filter to a unlike Smart Object instead? Just drag the filter to the new Smart Object in the Layers panel. To re-create a filter to another Smart Object, hold downwardly Alt (Win) or Option (Mac) while you elevate. You can also duplicate filters within the same Smart Object by Alt/Pick-dragging.
- Delete Smart Filters. To permanently remove a Smart Filter from a Smart Object, elevate information technology to the trash icon in the Layers panel. To delete all Smart Filters for a Smart Object, drag the Smart Filters item to the trash icon.
Using filter masks
Filter masks add a whole new dimension to Smart Filters. By painting in black (or shades of grey) on a filter mask, yous can mask off the outcome of the filters in certain parts of the epitome. This allows you to apply filters selectively to the areas of the epitome that you want to touch on, while leaving other parts of the epitome alone.
Each Smart Object that has Smart Filters applied to it has its ain filter mask. You can see the filter mask thumbnail in the Smart Filters item in the Layers panel (shown in the screenshot beneath).
Filter masks conduct much similar layer masks. To draw on a filter mask:
- Select the filter mask. Click the filter mask thumbnail in the Layers console to select information technology. Yous'll run into a edge appear around the thumbnail.
- Draw on the filter mask. Pick a blackness foreground colour and a brush, and offset painting on the filter mask in the document window. To make the masking effect more subtle, pigment with a lighter shade of grey instead of black.
- Deselect the filter mask. To return to working on the Smart Object instead of its filter mask, click the Smart Object's thumbnail to reselect it.
Besides as drawing on a filter mask with a castor, you lot tin fill the mask with a gradient using the Gradient Tool, which is cracking for fading a filter issue out from foreground to background in the prototype (or vice-versa). Some other handy technique is to select an area of an image to mask past using the Magic Wand or other selection tool, and then filling the selection with black.
Say, for instance, that yous want to blur only the background in an prototype, while keeping the foreground sharp. To do this, yous can use the Brush Tool, or a combination of the selection tools and Pigment Saucepan Tool, to fill the foreground areas of the filter mask with black, thereby masking off the Gaussian Blur effect in the foreground:

Select the filter mask past clicking its thumbnail, then paint black on the mask to mask off the mistiness event from the planes in the foreground, keeping them precipitous.
If yous want to disable the furnishings of a filter mask, thereby applying the filters to the whole image again, you tin can Shift-click the filter mask thumbnail. Shift-click information technology once more to re-enable the mask.
By the way, you tin can load a filter mask as a selection by Command-clicking (Win) or Command-clicking (Mac) the filter mask thumbnail.
Smart Filter blending options
The last great feature of Smart Filters that you'll explore hither are blending options. Yous can modify a Smart Filter's alloy mode and opacity by double-clicking the piddling sliders icon on the right-hand side of the Smart Filter in the Layers panel (come across the screenshots below).
This gives you even more creative command over your filters. For example, hither'due south a Glowing Edges Smart Filter applied to the planes image. Nice upshot, merely much of the original photo is lost:
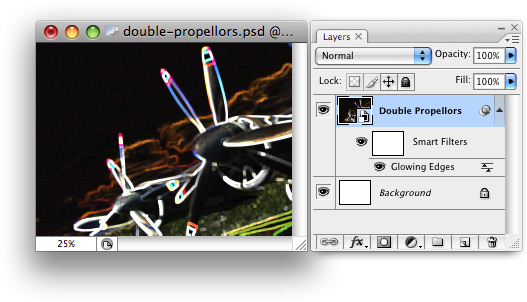
The Glowing Edges filter gives a nice result, but loses much of the original epitome.
Past changing the Smart Filter's blend fashion to Linear Dodge (Add together) and knocking the opacity down to 70%, yous can create a more pleasing effect that incorporates more of the original epitome:

By setting the filter's blend mode to Linear Dodge (Add) and reducing the opacity to 70%, you get a more subtle effect that blends nicely with the original photo.
Summary
In this tutorial you've explored Photoshop'south wonderful Smart Filters feature. You lot've seen how to:
- Apply Smart Filters to a Smart Object
- Tweak a Smart Filter's settings after applying it
- Toggle, reorder, move, copy, and delete Smart Filters
- Use filter masks to hide Smart Filters in certain parts of the image, and
- Create a variety of effects by changing Smart Filter blending options.
Happy Photoshopping!

How To Use Smart Filters In Photoshop,
Source: https://www.elated.com/photoshop-smart-filters/
Posted by: denneysoperypear.blogspot.com
0 Response to "How To Use Smart Filters In Photoshop"
Post a Comment